This guide walks you through the complete Mac setup process, from identifying your Mac type through your first successful OTAC run. If you are on Windows, use the Windows Setup Guide instead.
Need help or got stuck? The User Guide has detailed troubleshooting, a command-line reference, and answers to common questions. You can also open OTAC_USER_GUIDE.html from the OTAC_Desktop folder for offline access.
Step 1 — Find Out What Kind of Mac You Have
You need to know whether your Mac uses Apple Silicon or an Intel chip so you can download the correct version of Docker Desktop.
Click the Apple menu in the top-left corner of your screen.
Choose About This Mac.
Look at the Chip or Processor line:
If it says…
Your Mac is…
M1, M2, M3, or M4
Apple Silicon — most Macs made in 2021 or later
Intel
Intel chip — Macs made before 2021
Step 2 — Download and Install Docker Desktop
Docker is free software that OTAC runs inside. You only install it once. You can learn more about Docker Desktop at docker.com/products/docker-desktop before downloading.
Download Docker Desktop
Your Mac
Download
Mac — Apple Silicon M1, M2, M3, or M4 — made in 2021 or later
Drag the Docker icon into your Applications folder.
Open Docker Desktop from your Applications folder.
Enter your Mac password if prompted.
Look for the Docker whale icon in the menu bar (top-right of screen).
Wait until the whale icon stops animating. Docker is now ready.
Sign-in prompt: Docker may ask you to sign in or create an account. You do not need to sign in. Click Skip or Continue without signing in. Docker Desktop is free to use without an account.
Why Docker? OTAC uses machine learning models that require many supporting software components. Docker bundles all of those components together so everything works correctly on your computer without you needing to install anything else.
Step 3 — Download and Extract OTAC
Download the OTAC package and extract it to your computer.
Save OTAC_Desktop.zip somewhere easy to find, such as your Documents folder.
Double-click the ZIP file to extract it, or open it and drag the OTAC_Desktop folder to your chosen location.
You will have a folder called OTAC_Desktop containing all the files needed to run OTAC.
Choose a simple folder path. Avoid spaces or special characters in the path. Good:~/Documents/OTAC_Desktop Avoid:~/My Files (2026)/OTAC!
Step 4 — Open Terminal and Navigate to the OTAC Folder
New to Terminal? Terminal is a text window where you type commands. You do not need to be a programmer; you only need to type one command in this step. The Terminal responds immediately when you press Return. Nothing will happen to your files just from navigating to a folder.
Press Command + Space to open Spotlight, type Terminal, and press Return. A window with a text prompt will open. This is normal.
Find your username: look at the Terminal prompt: it shows something like jane@MacName ~ % where jane is your username.
Type the command below and press Return. If you saved OTAC_Desktop somewhere other than Documents, use that path instead:
cd ~/Documents/OTAC_Desktop
What you see after pressing Return
What it means
Prompt changes to OTAC_Desktop % (or similar)
You are in the right folder — continue to Step 5
"No such file or directory"
The path is wrong. Check the folder location in Finder and try again.
Not sure of the folder path? Open Finder, locate the OTAC_Desktop folder, then right-click it and choose Get Info. The path appears under the Where: line. Combine it with the folder name, for example: /Users/Jane/Documents/OTAC_Desktop.
Step 5 — Start OTAC
To start or run OTAC, Docker Desktop must be running. Confirm the Docker whale icon is visible in your menu bar (top-right) and has stopped animating before continuing.
Confirm Docker is ready: in the Terminal window from Step 4, type the command below and press Return. Docker will print several lines of information. Scroll up in the Terminal window to see if the block of text starts with the word Client:. If it does, Docker is ready. If you see an error instead, open Docker Desktop and wait for the whale icon to stop animating, then try again.
docker info
Run the following command to start OTAC, then keep the Terminal window open while OTAC is running:
docker compose up --build
First time only — this takes 20–30 minutes. OTAC must download and install its components, which requires internet access. You will see many lines of text scrolling past. This is normal. Do not close the Terminal window.
Build phases and what you will see:
Phase
Approx. time
What appears in Terminal
Downloading base image
2–5 min
Lines like Pulling from library/python, progress bars
Installing PyTorch & ML libraries
10–15 min
Lines like Collecting torch, Downloading torch-...
Installing OTAC application
2–5 min
Lines like COPY . /app, RUN pip install
OTAC starting up
1–2 min
You can now view your Streamlit app in your browser.
Every run after the first will take under 30 seconds.
Verify OTAC is running
When Terminal shows You can now view your Streamlit app in your browser., open your browser and go to:
http://localhost:8501
The page loads in two stages:
Dark background with a running figure in the upper-right corner. OTAC is finishing its startup. Wait 30–60 seconds.
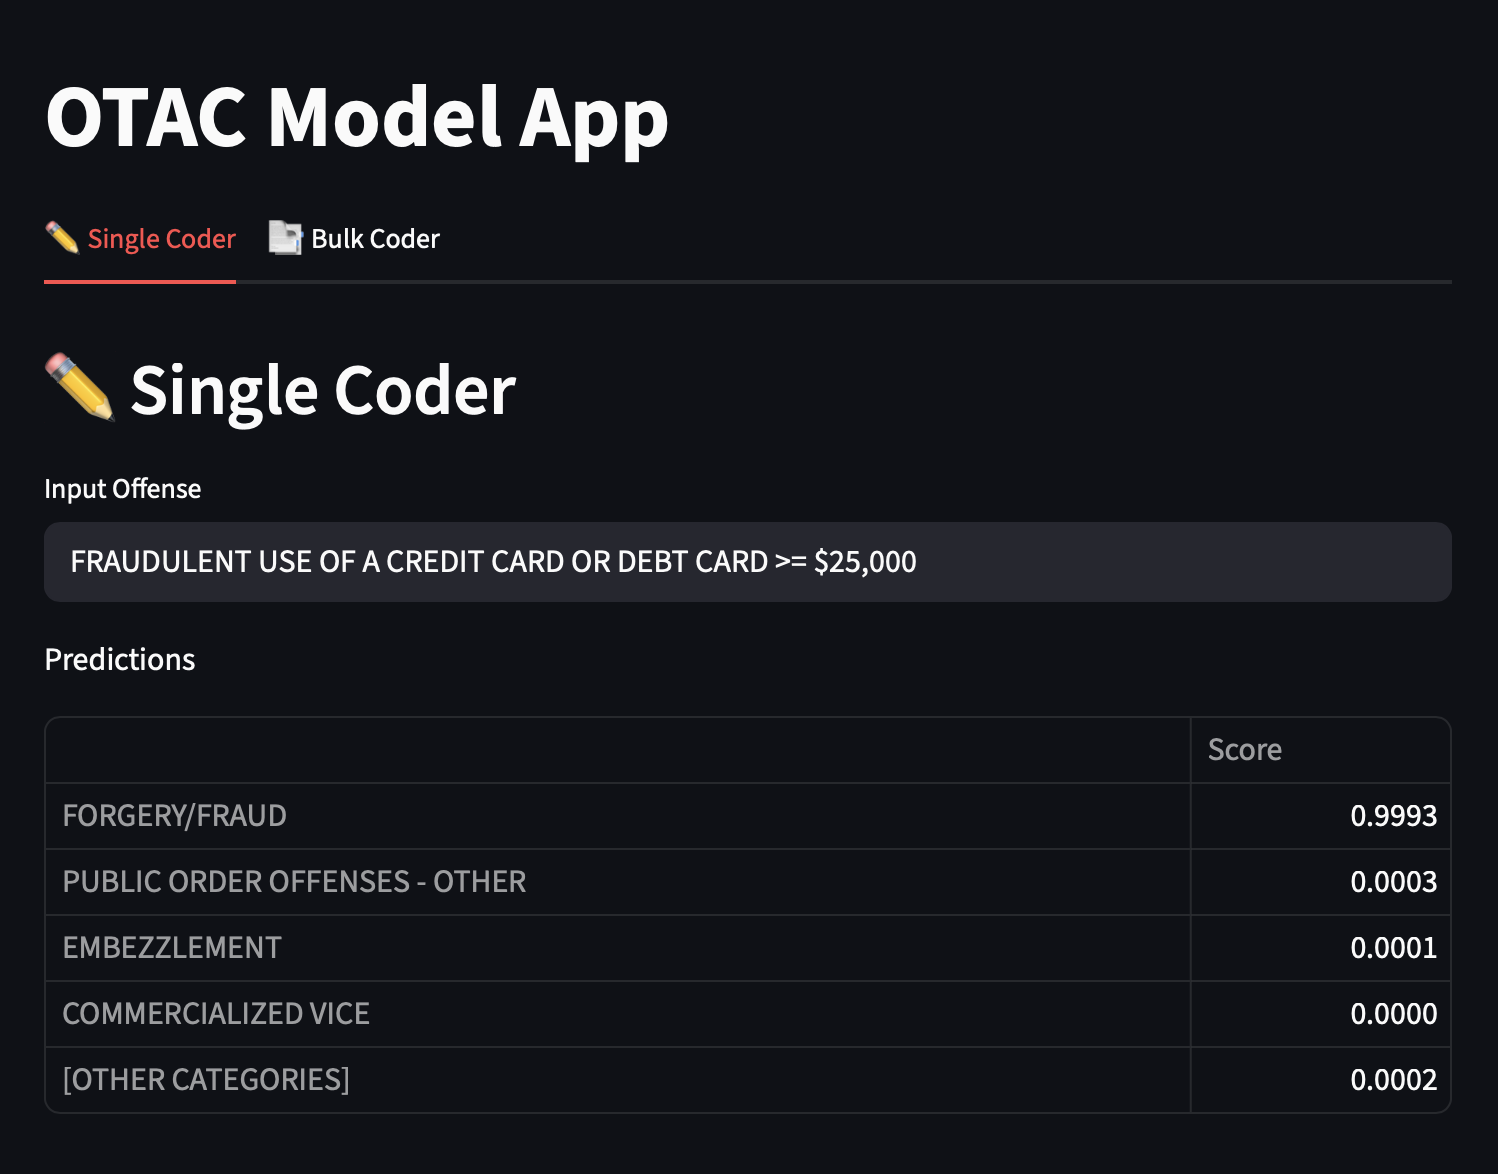
The OTAC interface appears. You will see the title "OTAC Model App" with tabs for Single Coder and Bulk Coder. OTAC is ready to use.
The OTAC interface when fully loaded — Single Coder tab shown
Page is blank or shows an error? Wait 60 seconds and press Command + R to refresh. If the problem persists, check that the Terminal window is still open and shows no red error messages. See the User Guide for troubleshooting steps.
Step 6 — Use OTAC
OTAC opens to the Single Coder tab by default. There are two tabs at the top of the page:
Tab
What it does
Single Coder (default)
Type one offense description and OTAC predicts its category instantly
Bulk Coder
Upload a CSV or XLSX file to classify many offenses at once
Single Coder
Type an offense description into the text box and OTAC will display predicted categories immediately. Use this to test individual offenses or look up a single case.
Bulk Coder — uploading a file
Click the Bulk Coder tab at the top of the OTAC page.
OTAC accepts a plain-text CSV file or an Excel XLSX document. Click Browse files and upload your CSV or XLSX file.
OTAC can accept a file with a single column of offense strings, or a file with multiple columns as long as one of them contains offense strings. If your file has multiple columns, select the offense text column from the dropdown that appears.
To increase classification speed, OTAC will use only the offense string column and will automatically deduplicate repeated offense strings before processing.
Click Compute Predictions.
A Sample Output table appears showing predicted categories for the first 50 rows.
Scroll to the bottom of the sample table and click Download data as CSV to save the full results to your computer.
The downloaded file will contain only the deduplicated offense strings, predicted offense classifications, and confidence scores. If your original file had other columns, you will need to merge the predictions back into your full data using the offense strings as a linking key.
Test it first: The otac_sample.csv file in your OTAC_Desktop folder contains 100 sample offense strings. Upload it in Bulk Coder to confirm everything is working before using your own data.
Stopping OTAC
When you are finished, stop OTAC to free up memory:
Press Control + C in the Terminal window where OTAC is running.
After OTAC stops, run docker compose down to remove containers and fully free memory.
OTAC also stops automatically when you restart or shut down your computer.
Troubleshooting
Problem
Solution
"Docker is not installed"
Follow Step 2 above to download and install Docker Desktop
"Docker is not running"
Open Docker Desktop and wait for the whale icon to stop animating
Browser shows a blank page or error
Wait 30–60 seconds and press Cmd + R to refresh
"Docker build failed" (first run)
Check your internet connection. A corporate firewall may need IT to allow Docker Hub access.
"docker: command not found"
Docker is not installed, or your Mac needs a restart. Install Docker Desktop (Step 2) and restart.
"Cannot connect to the Docker daemon"
Docker Desktop is not running. Open it and wait for the whale icon to stop animating.
"no configuration file provided"
You are not in the OTAC_Desktop folder. Use the cd command from Step 4 to navigate there.
"port 8501 is already in use"
OTAC is already running. Open http://localhost:8501 in your browser, or run docker compose down to stop it first.
Page loads but looks broken
Try a different browser (Chrome, Safari, or Firefox)
For more detail, see the User Guide, or open OTAC_USER_GUIDE.html in the OTAC_Desktop folder for offline reference.